CRUD in SQL: Unleashing the Power of Seamless Data Manipulation
Table of Contents
Introduction
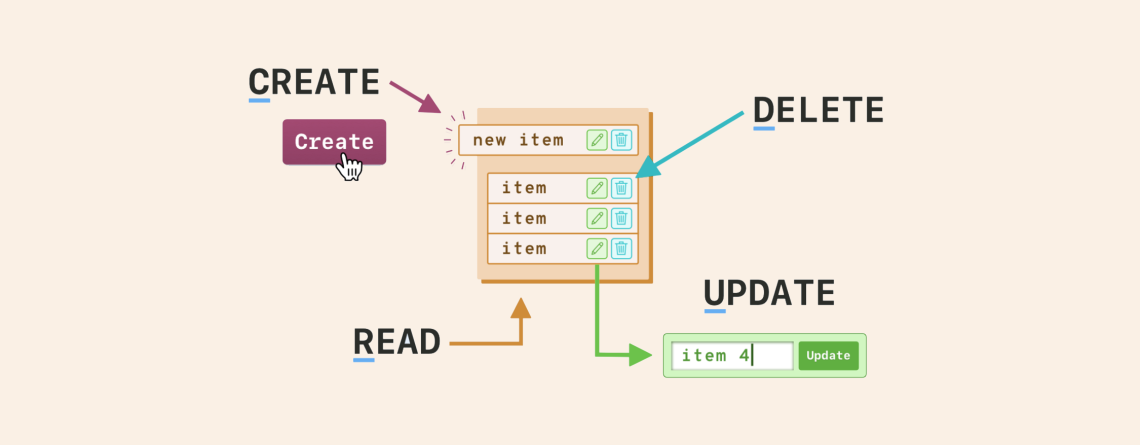
Any reliable software system must include database administration at its core, and frictionless data manipulation requires a solid understanding of SQL CRUD procedures. The basic operations for interacting with data are represented by the acronym CRUD, which stands for Create, Read, Update, and Delete. We’ll go over these procedures in this blog article along with some code samples to help you see how powerful SQL can be for effective data management.
1. Creating Data: The ‘C’ in CRUD
Now let’s explore the core function of database administration, which is data creation. Add new records to our database tables is a crucial function made possible by the ‘C’ in CRUD, which stands for Create. The INSERT statement is the main SQL tool for this action. Let’s examine the procedure with some code samples.
Basic Data Insertion
Consider a scenario where you have a ‘users’ table, and you want to add a new user to it. Here’s a simple SQL query:
-- Creating a new user
INSERT INTO users (username, email, age)
VALUES ('JohnDoe', 'john.doe@email.com', 25);
In this example, we’re using the INSERT INTO statement to specify the target table (‘users’). The columns we’re populating (username, email, age) are listed in parentheses. The VALUES keyword is then used to provide the corresponding data for the new record.
Inserting Multiple Records
To insert multiple records in a single query, you can extend the VALUES clause with additional sets of data:
-- Adding multiple users
INSERT INTO users (username, email, age)
VALUES
  ('JaneSmith', 'jane.smith@email.com', 30),
  ('BobJohnson', 'bob.johnson@email.com', 28),
  ('AliceBrown', 'alice.brown@email.com', 22);
This query adds three new users to the ‘users’ table in one go.
Inserting Data with a Subquery
You can also use a subquery to insert data based on the result of another query. For example, if you have a ‘temporary_users’ table with new users, you can insert them into the ‘users’ table:
-- Inserting users from temporary table
INSERT INTO users (username, email, age)
SELECT username, email, age
FROM temporary_users
WHERE age > 25;
This query selects users from ‘temporary_users’ with an age greater than 25 and inserts them into the ‘users’ table.
Conclusion: Empowering Data Creation in SQL
Mastering the ‘Create’ operation in SQL opens up avenues for building and expanding your database. Whether adding individual records or bulk data, understanding the INSERT statement and its variations is crucial. As you delve deeper into SQL, the ability to seamlessly create data will be a fundamental skill, laying the groundwork for effective database management. Stay tuned for the next installment as we continue our journey through CRUD in SQL.
2. Reading Data: The ‘R’ in CRUD
Now, let’s delve into the ‘R’ in CRUD: Reading data from a database using SQL’s SELECT statement. This operation is fundamental to retrieving information and gaining insights into your dataset. Let’s explore the process with code examples.
Basic Data Retrieval
The simplest form of a SELECT statement retrieves all columns for all rows in a table:
-- Retrieving all users
SELECT * FROM users;
In this query, the asterisk (*) is a wildcard character that represents all columns. This query fetches all records from the ‘users’ table.
Filtering Data with WHERE Clause
To narrow down the results, you can use the WHERE clause. For instance, if you want to retrieve information about a specific user:
-- Retrieving a specific user
SELECT *
FROM users
WHERE username = 'JohnDoe';
This query fetches all columns for the user with the username ‘JohnDoe’ from the ‘users’ table.
Selecting Specific Columns
If you’re only interested in specific columns, you can specify them in the SELECT statement:
-- Retrieving usernames and emails
SELECT username, email
FROM users;
This query fetches only the ‘username’ and ’email’ columns for all users.
Sorting Data with ORDER BY
You can sort the results using the ORDER BY clause. For instance, to retrieve users sorted by age in ascending order:
-- Retrieving users sorted by age
SELECT *
FROM users
ORDER BY age ASC;
This query returns all columns for users, ordered by their age in ascending order.
Conclusion: Empowering Data Retrieval in SQL
Mastering the ‘Read’ operation in SQL is essential for extracting valuable information from your databases. The SELECT statement, combined with clauses like WHERE and ORDER BY, provides powerful tools for tailoring your queries to specific needs. As you continue your SQL journey, the ability to effectively retrieve and analyze data will become a cornerstone of your database management skills. Stay tuned for the next installment as we explore the ‘Update’ operation in CRUD, bringing you one step closer to mastering SQL data manipulation.
3. Updating Data: The ‘U’ in CRUD
Greetings from the ‘U’ of CRUD: SQL data updating. For your database to have correct and current information, you must be able to edit existing records. For this, SQL offers the UPDATE statement. Let’s look at some code samples to demonstrate how to fully utilize seamless data updates.
Basic Data Update
The most straightforward use of the UPDATE statement involves modifying the values of specific columns for a given record. For example, let’s say we want to update John Doe’s age to 26:
-- Updating user's age
UPDATE users
SET age = 26
WHERE username = 'JohnDoe';
In this query, the SET clause specifies the new values, and the WHERE clause ensures that only the record matching the specified condition (in this case, the user with the username ‘JohnDoe’) is updated.
Updating Multiple Columns
You can update multiple columns simultaneously by extending the SET clause:
-- Updating user's age and email
UPDATE users
SET age = 27, email = 'john.doe.updated@email.com'
WHERE username = 'JohnDoe';
This query updates both the age and email for the user with the username ‘JohnDoe’.
Conditional Updates
Performing updates based on a condition is a powerful feature. For example, let’s say you want to increment the age of all users who are currently 25:
-- Incrementing age for users who are 25
UPDATE users
SET age = age + 1
WHERE age = 25;
This query increases the age by 1 for all users who are currently 25 years old.
Conclusion: Empowering Data Updates in SQL
The ‘Update’ operation in CRUD allows you to keep your database in sync with evolving information. The UPDATE statement, combined with conditionals and multi-column updates, provides the flexibility needed to tailor your modifications precisely. As you continue your SQL journey, the ability to seamlessly update data will prove essential for maintaining the accuracy and relevance of your database records. Stay tuned for the next installment, where we’ll explore the ‘Delete’ operation in CRUD, completing our journey through the fundamentals of SQL data manipulation.
4. Deleting Data: The ‘D’ in CRUD
Now, let’s explore the ‘D’ in CRUD: Deleting data in SQL. The ‘Delete’ operation is crucial for managing your database by removing records that are no longer needed. SQL provides the DELETE statement for this purpose. Let’s delve into how to unleash the power of seamless data deletions with code examples.
Basic Data Deletion
The most straightforward use of the DELETE statement involves removing specific records based on a condition. For instance, if we want to delete the user with the username ‘JohnDoe’:
-- Deleting a user
DELETE FROM users
WHERE username = 'JohnDoe';
In this query, the DELETE FROM statement specifies the target table (‘users’), and the WHERE clause ensures that only the record matching the specified condition (in this case, the user with the username ‘JohnDoe’) is deleted.
Deleting All Records
To delete all records from a table, you can use the DELETE FROM statement without a WHERE clause:
-- Deleting all users
DELETE FROM users;
This query removes all records from the ‘users’ table. Exercise caution when using this operation, as it permanently deletes all data in the specified table.
Conditional Deletions
Performing deletions based on a condition allows you to remove records that meet specific criteria. For example, let’s say we want to delete users who haven’t logged in for more than a year:
-- Deleting inactive users
DELETE FROM users
WHERE last_login_date < '2023-01-01';
This query deletes users with a last login date earlier than January 1, 2023.
Deleting with Subqueries
You can also use subqueries to perform more complex deletions. For instance, let’s say we want to delete all orders associated with a specific product:
-- Deleting orders for a specific product
DELETE FROM orders
WHERE product_id IN (SELECT product_id FROM products WHERE product_name = 'ObsoleteProduct');
This query deletes all orders for a product with the name ‘ObsoleteProduct’.
Conclusion: Empowering Data Deletions in SQL
The ‘Delete’ operation in CRUD is essential for maintaining a clean and relevant database. The DELETE statement, combined with conditionals and subqueries, provides the flexibility needed to precisely remove unwanted records. As you continue your SQL journey, the ability to seamlessly delete data will prove crucial for ensuring the efficiency and tidiness of your database. With this, we complete our exploration of CRUD operations in SQL. Happy coding!
5. Transaction Management: Ensuring Data Integrity
Welcome to the world of transaction management in SQL, a critical aspect that ensures data integrity within your database. Transactions help maintain the consistency and reliability of your data by grouping multiple SQL statements into a single, atomic operation. In this segment, we’ll explore the importance of transactions and provide code examples to illustrate their usage.
Understanding Transactions
A transaction is a sequence of one or more SQL statements that are executed as a single unit of work. The primary goal is to ensure that either all the statements within the transaction are executed successfully, or none of them are.
Starting a Transaction
You can initiate a transaction using the BEGIN TRANSACTION statement. For example:
-- Starting a transaction
BEGIN TRANSACTION;
This marks the beginning of a transaction, and any subsequent SQL statements will be part of this transaction until it is either committed or rolled back.
Committing a Transaction
To permanently apply the changes made within a transaction, you use the COMMIT statement:
-- Committing the transaction
COMMIT;
This statement signifies that all the SQL statements within the transaction were executed successfully and should be permanently saved to the database.
Rolling Back a Transaction
If an issue arises during the execution of the transaction and you need to discard all changes, you can use the ROLLBACK statement:
-- Rolling back the transaction
ROLLBACK;
This statement undoes all changes made during the transaction, reverting the database to its state before the transaction began.
Example: Ensuring Atomicity
Consider a scenario where you want to update the age of a user and simultaneously insert a new record into an audit log. Using transactions ensures the atomicity of these operations:
-- Starting a transaction
BEGIN TRANSACTION;

-- Updating user's age
UPDATE users
SET age = 28
WHERE username = 'JohnDoe';

-- Inserting audit log
INSERT INTO audit_log (username, action, timestamp)
VALUES ('JohnDoe', 'Age Updated', CURRENT_TIMESTAMP);

-- Committing the transaction
COMMIT;
In this example, if either the update or the insertion fails, the entire transaction is rolled back, preserving the consistency of the database.
Conclusion: Ensuring Data Consistency with Transactions
Transactions play a vital role in maintaining data integrity within a database. By grouping related SQL statements into atomic operations, you ensure that your database remains consistent, even in the face of errors or unexpected issues. As you continue to work with databases and SQL, incorporating transaction management into your toolkit will prove essential for building robust and reliable systems. Happy coding!


Leave a Reply