
How to use SQL Membership Provider in ASP.NET
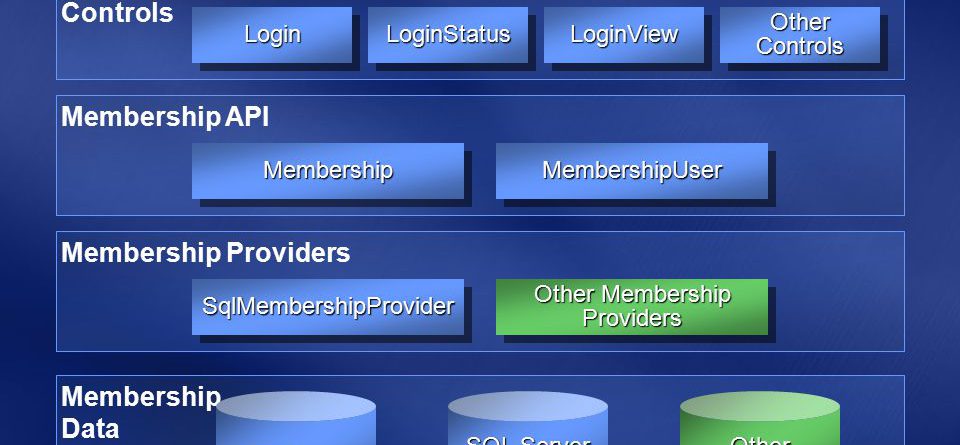
The ASP.NET membership feature provides secure credential storage for application users.
We will use the following:
- Web Page Named Login.aspx and another Web Page named CreateUser.aspx
- Login Control.
- Create User Wizard Control.
Steps:
1- Configure Forms Authentication in Web.config File
To configure forms authentication, set the <authentication> element’s mode attribute to “Forms” and then configure your application’s Web.config file as shown in the following example.
<authentication mode="Forms">
  <forms loginUrl="Login.aspx"
  protection="All"
  timeout="30"
  name="AppNameCookie"
  path="/FormsAuth"
  requireSSL="false"
  slidingExpiration="true"
  defaultUrl="default.aspx"
  cookieless="UseCookies"
  enableCrossAppRedirects="false" />
</authentication>
loginUrl points to the login page. You should place this in a folder that requires Secure Sockets Layer (SSL) for access.
protection is set to “All” to specify privacy and integrity for the forms authentication ticket.
timeout is used to specify a limited session lifetime.
name and path are set to unique values for the current application.
requireSSL is set to “false”. This configuration means that authentication cookie can be transmitted over channels that are not SSL-protected. If you are concerned with session hijacking, you should consider setting this to “true”.
slidingExpiration is set to “true” to enforce a sliding session lifetime. This means that the timeout is reset after each request to your application.
defaultUrl is set to the Default.aspx page for the application.
cookieless is set to “UseCookies” to specify that the application uses cookies to send the authentication ticket to the client.
enableCrossAppRedirects is set to “false”, to indicate that the application cannot redirect the request outside the application scope.
Add the following <authorization> element after the <authentication> element. This permits only authenticated users to access the application. The previously established loginUrl attribute of the element redirects unauthenticated requests to the Login.aspx page
<authorization>
   <deny users="?" />
   <allow users="*" />
</authorization>
2- Install the Membership Database
Before you can use the SqlMembershipProvider, you must install the SQL Server membership database.
To install the membership database, log on to your server with an account that has authority to administrate SQL Server (such as the Administrator account).
Open Visual Studio command prompt (Start > Microsoft Visual Studio > Visual Studio Tools > Visual Studio command prompt), and run the following command:
aspnet_regsql.exe -E -S localhost -A m
Where:
-E indicates authenticate using the Windows credentials of the currently logged on user.
-S (server) indicates the name of the server where the database will be installed or is already installed.
-A m indicates add membership support. This creates the tables and stored procedures required by the membership provider.
In Web.config:
<connectionStrings>
 <add name="MySqlConnection" connectionString="Data Source=MySqlServer;Initial Catalog=aspnetdb;Integrated Security=SSPI;" />
</connectionStrings>
<system.web>
...
 <membership defaultProvider="SqlProvider" userIsOnlineTimeWindow="15">
    <providers>
      <clear />
      <add
        name="SqlProvider"
        type="System.Web.Security.SqlMembershipProvider"
        connectionStringName="MySqlConnection"
        applicationName="MyApplication"
        enablePasswordRetrieval="false"
        enablePasswordReset="true"
        requiresQuestionAndAnswer="true"
        requiresUniqueEmail="true"
        passwordFormat="Hashed" />
    </providers>
 </membership>
The Last Step:
- Drag and drop Login Control into the Login page
- Drag and drop Create User Wizard Control into the CreateUser page
Now your Web Application or your Website is secured.


Comment (1)
Thank you for sharing this detailed guide on using the SQL Membership Provider in ASP.NET. Your step-by-step instructions make it easy to understand and implement secure credential storage for application users. Configuring forms authentication in the Web.config file and installing the membership database are essential steps in ensuring the security of user credentials. Additionally, the integration of Login and Create User Wizard controls streamlines the process and enhances the user experience. Your blog continues to be a valuable resource for developers seeking practical solutions for ASP.NET development. Keep up the great work!