How to Implement Modular Architecture in Your Next Project
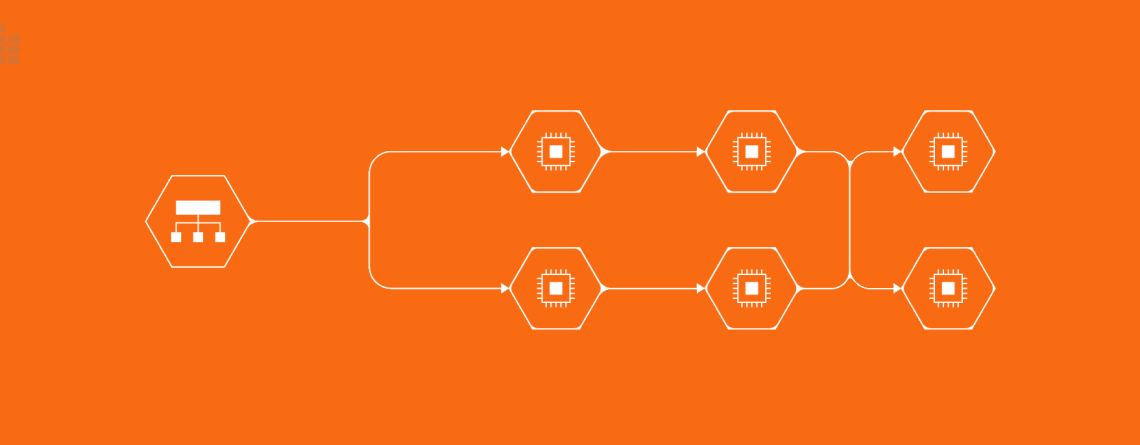
Modular architecture is a design approach that breaks down a complex system into smaller, independent, and interchangeable parts or modules. These modules can be thought of as building blocks that can be combined to create a complete system. Modular architecture has gained popularity in recent years as a way to improve the scalability, maintainability, and reusability of complex systems, particularly in software development.
Numerous systems, including software, hardware, and mechanical ones, use modular architecture. It offers a methodical and structured approach to system design, making the construction, upkeep, and gradual evolution of complex systems simpler.
Step 1: Identify the Modules
- Define the scope of the project: Determine what the project is intended to accomplish and what its boundaries are.
- Identify the functionalities: Break down the project into its core functionalities, each of which can be a potential module.
- Determine the dependencies: Analyze how the functionalities are interdependent and what are the dependencies between them.
- Evaluate the feasibility: Consider the size, complexity, and scope of each module and determine which modules can be developed and maintained independently.
- Prioritize the modules: Decide which modules are most important for the project’s success and prioritize their development.
Step 2: Define Interfaces
Interfaces serve as a contract between modules and define how they will interact with each other. Here are some steps to help define interfaces:
- Define the inputs and outputs: Determine what data each module will receive as input and what it will produce as output.
- Specify the behavior: Describe the behavior that each module is expected to exhibit when interacting with other modules.
- Establish naming conventions: Define consistent naming conventions for inputs, outputs, and functions to ensure that modules can be easily integrated.
- Document the interfaces: Document the interfaces thoroughly to provide a clear understanding of how the modules interact and what each module is responsible for.
Step 3: Design for Reusability
Designing modules with reusability in mind can help to improve the maintainability and scalability of your project. Here are some steps to help design for reusability:
- Keep modules small and focused: Each module should have a well-defined purpose and should be small enough to be easily understood and maintained.
- Encapsulate implementation details: Hide the internal implementation details of each module behind its interface, making it easier to change the implementation without affecting other modules.
- Avoid tight coupling: Minimize the dependencies between modules to make it easier to reuse modules in different contexts.
- Allow for customization: Provide options for customization or configuration to make it easier for modules to be adapted to different use cases.
- Consider compatibility with other modules: Ensure that modules are designed in a way that allows them to be easily integrated with other modules and systems.
Step 4: Test Modules in Isolation
Testing modules in isolation helps to ensure that they are working as expected and can be easily integrated into the overall project. Here are some steps to help with this process:
- Write unit tests: Write unit tests for each module to verify that it functions as expected in isolation.
- Use mock objects: Use mock objects to simulate the behavior of other modules, allowing you to test each module in isolation.
- Test edge cases: Test each module with a range of inputs, including edge cases and error conditions, to verify that it handles all cases correctly.
- Automate testing: Automate the testing process to make it easier to run tests and ensure that they are repeatable.
- Verify compatibility: Verify that the tested module is compatible with the interfaces and standards established for the project.
Step 5: Use Dependency Injection
Dependency injection is a technique that allows modules to declare their dependencies, rather than hard-coding them. Here are some steps to help with this process:
- Identify dependencies: Identify the dependencies that each module has on other modules and services.
- Declare dependencies: Declare the dependencies in a way that makes it clear what each module requires.
- Use an injection framework: Use a dependency injection framework, such as Dagger or Guice, to manage the dependencies and ensure that they are properly injected.
- Inject dependencies at runtime: Inject dependencies at runtime, rather than at compile time, making it easier to change the dependencies of a module without affecting other modules.
- Minimize the number of dependencies: Minimize the number of dependencies that each module has to make it easier to test and maintain.
By using dependency injection, you can improve the maintainability and testability of your project and make it easier to change the dependencies of individual modules without affecting the rest of the project. It also helps to make the relationships between modules explicit, making it easier to understand the dependencies between modules and the overall architecture of the project.
Step 6: Monitor and Maintain
Ongoing monitoring and maintenance are essential for ensuring that the project remains stable, secure, and usable over time. Here are some steps to help with this process:
- Monitor performance: Monitor the performance of the project to ensure that it is running smoothly and efficiently.
- Track errors and bugs: Track and fix errors and bugs as they arise, to ensure that the project remains stable.
- Update dependencies: Keep the dependencies of the project up to date, to ensure that they are secure and compatible with the latest versions of the modules they depend on.
- Refactor code: Regularly refactor code to improve its design, maintainability, and performance.
- Document changes: Document changes made to the project, to ensure that the project’s history is well-documented and to make it easier to understand the impact of changes.
By monitoring and maintaining the project, you can ensure that it remains stable, secure, and usable over time. This helps to reduce the risk of introducing bugs and makes it easier to make changes to individual modules without affecting the rest of the project.